Network Toolbox
The uniTerm Network Toolbox gathers common network tools in one place, with five parts:
- Network Scan — discover reachable hosts and open ports on a subnet
- Local Network Services — run temporary TFTP / FTP / HTTP / SSH/SFTP / Telnet / NFS / S3 servers on this machine for other devices to access
- Traffic Capture — capture packets on a local adapter or a remote host in real time, with filters and protocol decoding
- Firewall Management — manage firewalld / ufw over SSH: on / off, boot auto-start, and inbound port rules
- SSH Tunnel — local / remote / dynamic port forwarding with multi-tunnel management and monitoring
Entry: header menu → Network → Network Scan / Local Network Services / Traffic Capture / Firewall Management / SSH Tunnels.
Network Scan
The Network Scan dialog provides two sections: IP Scan and Port Scan.
IP Scan
Enter the first three octets of the subnet (e.g. 192.168.60) and a last-octet range (1–254), then click Scan to probe up to 254 addresses for reachable hosts. The result table shows:
- IP — click an IP to open the connection form prefilled with that host
- MAC / hostname — listed alongside the scan result
- Common service ports — well-known ports probed by the backend; open ports show a ✓, and clicking the ✓ creates a connection of the matching type
- Deep scan — a broader port probe of a single discovered host; results land directly in the port-scan list below
A progress bar is shown while scanning; click Stop at any time.
Port Scan
- Target IP — the host to probe
- Port range — "Common" scans a set of well-known ports; "Range" scans any 1–65535 interval
- Concurrency — number of parallel probes. Keep it low: high values get rate-limited by firewalls and can hide open ports
- Results — host / port / service / state; click a row to create a connection
Exporting results
Right-click either result table to copy the results to the clipboard or export them to a file.
Local Network Services
Local Network Services run temporary servers on this machine for other devices on the network — pushing config files to network devices, sharing a directory on the fly, or providing a Telnet console for embedded systems. Pick a service in the left list and click ▶ to start / ⏸ to stop; edit settings and watch the server output on the right.
| Service | Default port | Notes |
|---|---|---|
| HTTP | 80 | Directory sharing; optional directory listing |
| TFTP | 69 | Firmware / config transfer for network devices; block size adjustable (512–65464) |
| FTP | 21 | Username/password or anonymous access; optional UTF-8 charset |
| SSH/SFTP | 22 | Interactive terminal plus SFTP file transfer (file access limited to the shared directory); username and password required |
| Telnet | 23 | Exposes the machine's shell over Telnet (plaintext protocol; trusted networks only); password required |
| NFS | 2049 | Experimental NFSv4 server on an in-memory filesystem; data written to the mount is lost when the server stops |
| S3 | 9000 | Experimental S3-compatible server over a local directory; use an S3 client without signature verification |
Common settings:
- Root directory — the directory exposed by file services (HTTP / TFTP / FTP / SSH/SFTP / S3); type a path or pick one with the browse button
- Auto stop — automatically stop the service after a configured number of seconds (off by default)
- Server output — the log area at the bottom right shows live server output
Security note
FTP and Telnet are plaintext protocols; use them temporarily on trusted networks only, and let "Auto stop" shut services down for you.
Traffic Capture
Capture and decode packets on a network interface in real time, in local or remote mode:
- Local — pick a local adapter and start capturing. On Windows, if the app is not running as administrator an elevated worker process is launched automatically; on Linux / macOS root or the equivalent privilege is required (
CAP_NET_RAW//dev/bpf) - Remote — pick an SSH host and a remote interface (or "all interfaces"); traffic is captured with
tcpdumpon the remote host (the target host must have tcpdump installed, e.g.sudo apt install tcpdump)
Features:
- Filter — BPF-style expressions supporting
tcp / udp / icmp / arp / ipv4 / ipv6,port N,host IP,src / dst; leave empty to capture everything - Live list — time / protocol / source / destination / service / flags / length columns refresh in real time; click a packet to see its per-protocol field tree and raw data (hex)
- Export — save results as CSV or PCAP
- Capture cap — capture stops automatically when the buffer limit is reached, so memory cannot grow unbounded
Firewall Management
Manage the firewall of a Linux host over SSH (firewalld and ufw are supported) — handy for remote servers without a desktop environment:
- Host — pick an SSH host to connect to; the target must have firewalld or ufw installed, and the account needs root or sudo privileges
- Firewall status — view and toggle the running state (on / off)
- Boot auto-start — toggle whether the firewall is loaded automatically on system restart, independent of the current running state
- Port rules — add inbound allow rules: a single port or a range (e.g.
8000-8100), with an optional source IP (empty = any); rules can be removed from the list - Save / Apply — firewalld rules are written to the permanent configuration first, then applied manually to reload; UFW rule changes take effect immediately on save
- SSH self-lockout check — before saving / applying, the inbound allow rule for the current SSH port is verified so you cannot lock yourself out of the server
SSH Tunnel
uniTerm has a built-in SSH Tunnel Manager that supports three forwarding modes. You can create, manage, and monitor multiple tunnel connections.
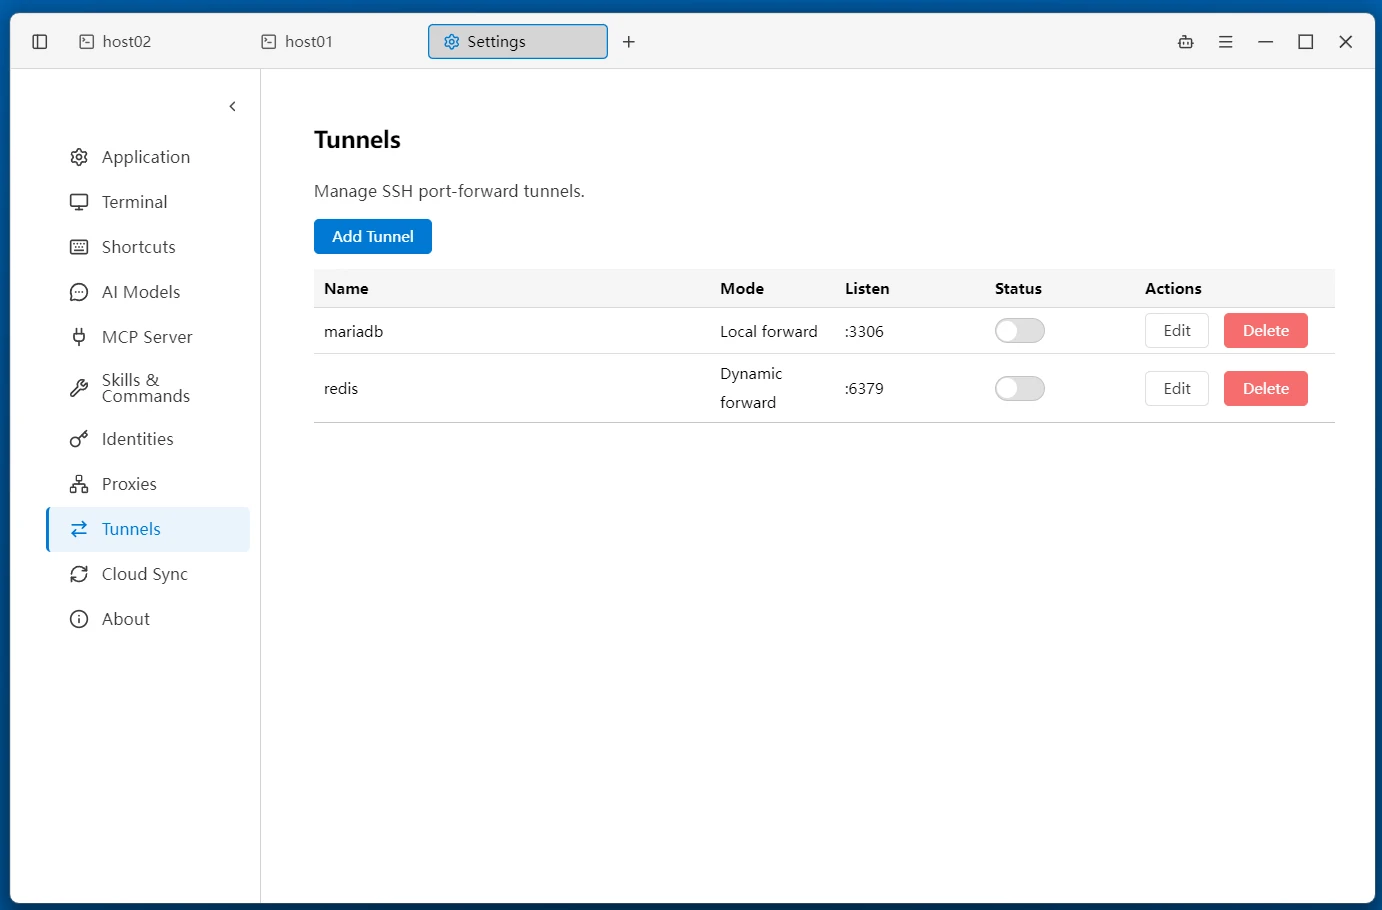
Tunnel Manager
SSH tunnels are managed in a dedicated sidebar tab, as well as in Settings → SSH Tunnels. Click the tunnel icon in the left sidebar to open the tunnel panel and view all created tunnels along with their running status. A search box is provided at the top of the panel.
- Status Indicator — Green means running; yellow means connecting or waiting to reconnect; gray means stopped; red means an error (hover for error details)
- Right-Click Menu — Right-click a tunnel item to start, stop, edit, or delete the tunnel (stop running, connecting, or reconnecting tunnels before editing)
- Drag-and-Drop Groups — Drag tunnel items into groups for organized management
- Credential Prompt — When starting an exit SSH connection for a tunnel without saved credentials, a dialog prompts for them instead of failing outright
- Start Failure Hints — When a tunnel fails to start, the actual reason is reported, along with a configuration test and a sample SSH command
Three Forwarding Modes
Local Forwarding (-L)
Map a remote server's port to your local machine, accessing the remote service through a local port.
Typical Scenario: A remote database (e.g., MySQL :3306) is not publicly accessible. With local forwarding mapping it to localhost:3307, local tools can connect directly.
Local Port :3307 → SSH Tunnel → Remote Database :3306Remote Forwarding (-R)
Expose a local port to a remote server, allowing remote hosts to access your local service through their local port.
Typical Scenario: A locally developed service needs to be accessed by a remote server or external users, such as exposing a local web app to a public server through remote forwarding.
Remote Port :8080 → SSH Tunnel → Local Service :3000Dynamic Forwarding (-D, SOCKS5)
Set up a local SOCKS5 proxy, allowing browsers or other applications to access all services within the remote network through the proxy.
Typical Scenario: Access all internal web systems, APIs, etc. within a corporate network through a jump host, without configuring individual port forwards.
Browser → SOCKS5 :1080 → SSH Tunnel → All Services in Remote NetworkCreating a Tunnel
- Click New Tunnel in the tunnel panel
- Select an SSH Connection as the jump host (requires an SSH connection to be created in the connection list first)
- Choose a Forwarding Mode: Local, Remote, or Dynamic
- Fill in the local address/port and target address/port based on the mode (Dynamic mode only requires a local port)
- Optional: Enable Auto-Start to automatically connect the tunnel on application launch
- Optional: Enable Auto-Reconnect, set the base retry interval (120 seconds by default, configurable from 1 to 86400 seconds), and set random jitter (0–100%, default 0%)
Auto-Start
When auto-start is enabled, the tunnel will automatically connect when uniTerm starts. This is useful for tunnels that need to remain connected at all times, such as a SOCKS5 proxy for a development environment.
Auto-Reconnect
Auto-reconnect is configured per tunnel and works with local, remote, and dynamic forwarding. When enabled, an unexpected SSH disconnect or a failed connection attempt puts the tunnel into Waiting to reconnect. It retries after the configured interval and keeps retrying if an attempt fails. The delay starts when a disconnect is detected or a connection attempt fails.
With jitter set to 0%, the interval is fixed. For example, a base interval of 120 seconds with ±20% jitter gives each retry a fresh random delay between 96 and 144 seconds. Random delays are always at least 1 second.
Clicking Stop, deleting the tunnel, or quitting uniTerm cancels automatic retries. Click Start to resume. Auto-reconnect and auto-start can be enabled independently; testing a configuration never starts background retries.
Automatic connections require available SSH credentials. Temporary credentials entered for a manual start are reused only during that tunnel's current lifecycle and are not saved to disk by auto-reconnect. Connecting after an application restart still requires saved credentials.
Related
- Terminal — SSH connection configuration
- Workspace — Sidebar tab management
- Server Monitor — Real-time server monitoring via SSH