Installation and First Connection
This guide will help you download, install uniTerm, and establish your first connection.
Download and Installation
Download the installer for your platform from GitHub Releases or Gitee Releases:
Windows
- Installer — Double-click
uniterm-windows-amd64-installer-<version>.exeand follow the prompts to complete the installation (an arm64 installer is also available) - Portable — Download
uniterm-windows-amd64-portable-<version>.zip, extract it to any directory, and run theuniterm.exeinside — no installation required
macOS
- Choose the package based on your chip: Apple Silicon (M series) uses
arm64, Intel usesamd64 - Open the
.dmgimage, drag uniTerm into the Applications folder, then launch it from Launchpad or the Applications folder
Linux
.deb (Debian / Ubuntu, etc.) —
sudo dpkg -i uniterm-linux-amd64-<version>.debor double-click to install; afterwards, launch it from the application menu.rpm (Fedora / openSUSE, etc.) —
sudo rpm -i uniterm-linux-amd64-<version>.rpmor install with your package manager; afterwards, launch it from the application menu.tar.gz (universal) — Extract and run the
unitermbinary inside:bashtar xzf uniterm-linux-amd64-<version>.tar.gz ./uniterm
Android
- Download
uniterm-android-arm64-<version>.apkand install it directly on your phone
Runtime Dependencies
- Windows: WebView2 Runtime (built into Windows 10+; older systems need to install it)
- macOS: No extra dependencies (uses the system WebKit)
- Linux:
libgtk-3-0andlibwebkit2gtk-4.1-0(preinstalled on most desktop distros) - Android: Android 5.0+ (uses the system WebView, no extra dependencies)
Creating Your First Connection
Open uniTerm, click the + button in the left sidebar (New Connection), or type a host address in the start page search box and choose Quick Connect.
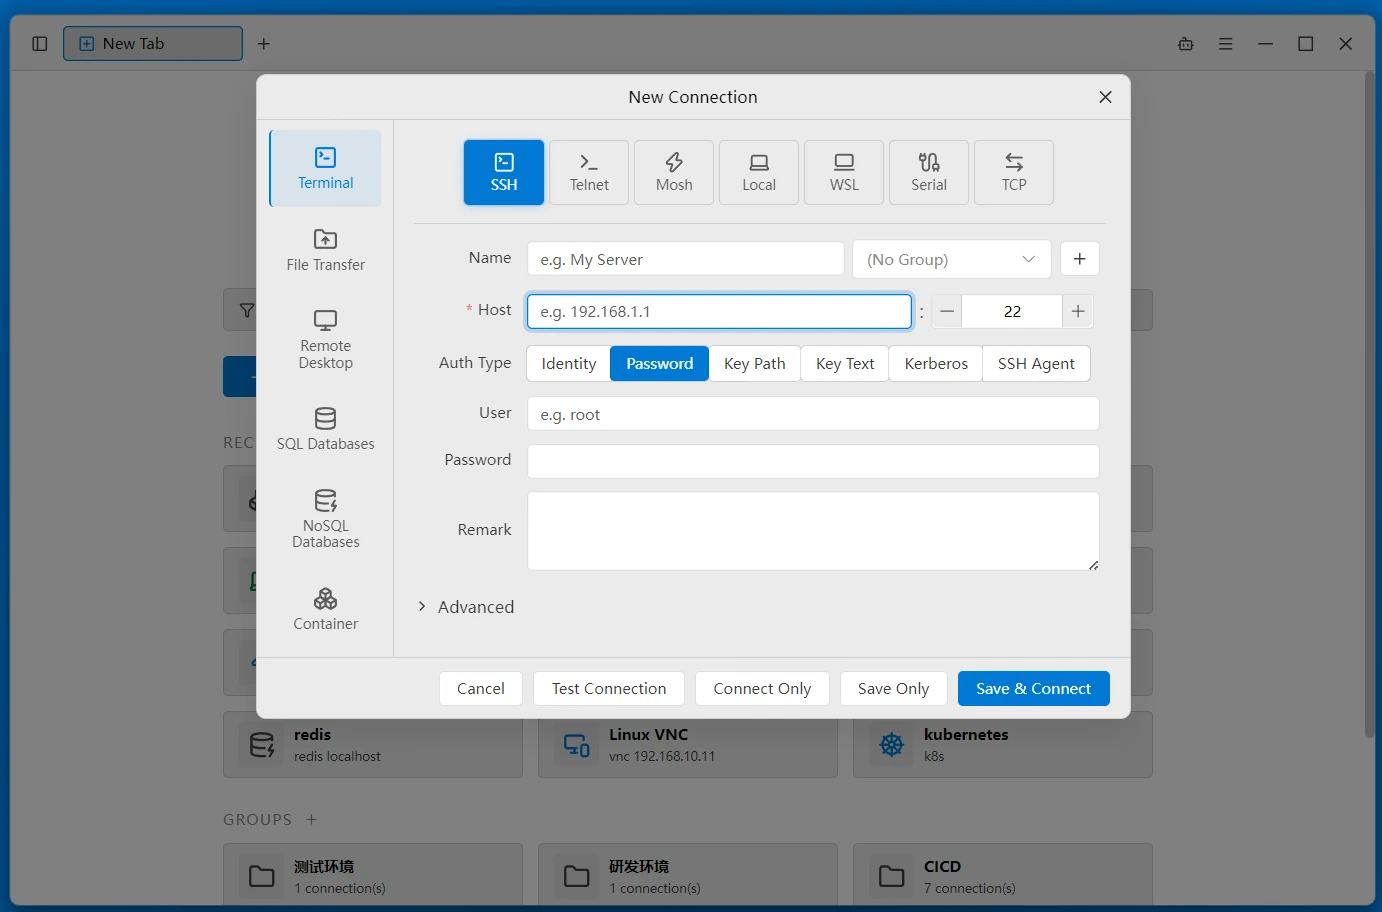
In the New Connection dialog, select the protocol type (e.g., SSH) and fill in the connection details:
- Name: Give the connection an easily recognizable name
- Host: Server IP address or domain name
- Port: The protocol's default port is filled in automatically
- Username: Login username
- Password: Login password; for other authentication methods, see Remote Terminal
Click Connect Only (opens without saving) or Save & Connect — saved connections appear in the left-hand list.
Double-click a connection to open its terminal/session.
Interface Overview
uniTerm's main interface consists of the following areas:
- Left Sidebar — Tabs for Connections, Files, Monitor, Tunnels, Quick Commands, and more; see Sidebar
- Central Terminal Area — Terminal tabs, supporting drag-and-drop splits to form workspaces
- Start Page — Quick-access entry point shown at launch, with search, favorites, and recent connections
Next Steps
- See Start Page to learn how to use the start page
- See Supported Protocols for all connection types
- See Remote Terminal for detailed usage of SSH/Telnet/Mosh
- See AI Assistant to configure the AI Agent
- See Personalization to adjust themes, interface font size, shortcuts, and language
- See FAQ to troubleshoot installation and connection issues